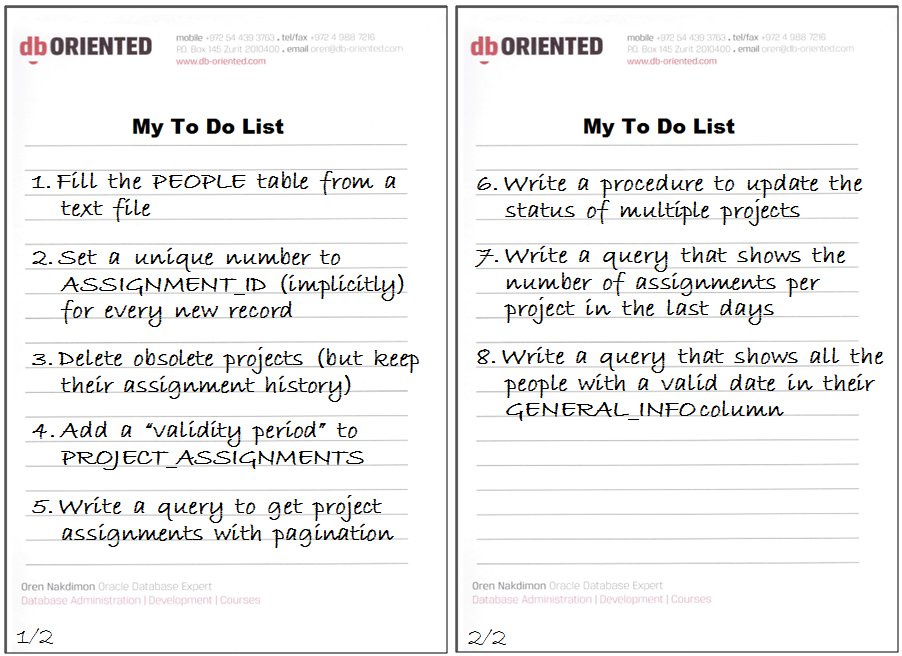
This post is part 2 of the Write Less with More series of blog posts, focusing on new features of Oracle 12c that allow us developers to write less than in previous versions in order to achieve the same functionality. Each part is dedicated for one new feature that solves some common development task. For more details, including the setup of the examples used throughout the series and the list of development tasks that drive the series, please see part 1.
All the Series Parts
Published
Part 1 – write less configuration with SQL*Loader Express Mode
Part 2 – write less application code with Identity Columns
Part 3 – write less application code with In-Database Archiving
Part 4 – write less application code with Temporal Validity
Part 5 – write less code in SQL with Row Limiting
Part 6 – write less “inappropriately located” code with SELECT FROM Package-Level Collection Types
Part 7 – write less code in SQL with Lateral Inline Views
Part 8 – write less “inappropriately located” code with PL/SQL in the WITH Clause
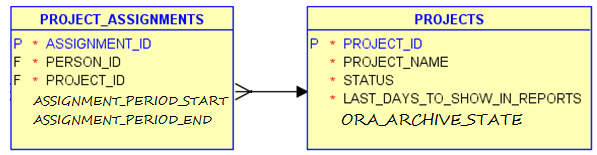
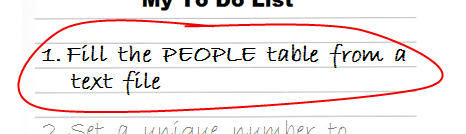
Task #2
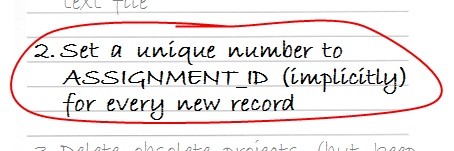
The PROJECT_ASSIGNMENTS table has a surrogate* primary key – each record should have a unique number in the ASSIGNMENT_ID column. This number has no business meaning; the only requirement for such a key is that the number will be unique – that there will be no two records in the table with the same number.
* In a recent post about defining primary keys using Data Modeler, HeliFromFinland is nicely walking through the decision making process of choosing between natural and surrogate keys
A Pre-12c Solution
This is a very common scenario, and almost always involves a sequence in Oracle. This makes sense, as a sequence is an object that generates unique numbers.
Before version 12c of Oracle there is no built-in relationship between tables and sequences, although logically there is almost always a one-to-one relationship between a table and a sequence.
Note: with the lack of a built-in relationship between tables and sequences, it is a good practice to use naming convention to represent this relationship; for example, naming the sequence that is responsible for assigning numbers to the ABC table ABC_SEQ (this specific convention implies yet another rule – that the length of table names should not exceed 26 characters; otherwise, the related sequence name will exceed the maximum length allowed for Oracle objects – 30 characters). Obviously, if two or more columns in one table are populated from different sequences, a more complex naming convention will be used.
So, the first part of the solution for our task is creating a sequence:
CREATE SEQUENCE project_assignments_seq;
The second part is to use the sequence whenever a new record of PROJECT_ASSIGNMENTS is inserted. If we know for sure about all the places that insert records to the table (preferably a single place) we can use the sequence explicitly in those places. However, if we cannot guarantee this, we should make sure the sequence will be used (as stated specifically in the task requirement) implicitly. And the way to achieve this in a pre-12c solution is using a BEFORE INSERT trigger, like this:
CREATE TRIGGER project_assignments_bir_tr
  BEFORE INSERT ON project_assignments
  FOR EACH ROW
BEGIN
  :new.assignment_id := project_assignments_seq.nextval; -- assuming 11g; in earlier versions use SELECT...
END;
/
Note that with this solution the sequence is used for each and every new record. Even if a value is specified explicitly in the INSERT (or MERGE) statement, this value will be ignored and overridden by the trigger, using the next value generated by the sequence.
If the requirement would be weaker – allowing specifying values explicitly and using the sequence only when values are not specified explicitly – then the solution would be:
CREATE TRIGGER project_assignments_bir_tr
  BEFORE INSERT ON project_assignments
  FOR EACH ROW
  WHEN (new.assignment_id IS NULL)
BEGIN
  :new.assignment_id := project_assignments_seq.nextval;
END;
/
Note that this option may cause problems. If you use it, make sure to allocate different (non-overlapping) ranges of numbers to the sequence and to the explicitly specified values. Otherwise, conflicts may happen.
A 12c Solution
Identity Columns
In Oracle 12c a table column can be created as “identity”. As a result, the column implicitly becomes mandatory, and a sequence is automatically created and associated with the table. Then (depending on how exactly the identity is defined) the sequence is automatically used to produce values for the identity column when new rows are inserted.
If you want to learn about many more new features of Oracle 12c, you may be interested in one of my in-house training sessions, particularly the Oracle 12c New Features for Developers full-day seminar.
The GENERATED ALWAYS Option
An identity column can behave in one of three different ways. In the first one – when the column is defined with the GENERATED ALWAYS AS IDENTITY option (or simply GENERATED AS IDENTITY) – the sequence is always used, and specifying explicit values is forbidden. Let’s use this option to implement our task:
drop table project_assignments purge;
create table project_assignments (
       assignment_id integer GENERATED AS IDENTITY constraint project_assignments_pk primary key,
       person_id integer not null constraint assignments_fk_people references people,
       project_id integer not null constraint assignments_fk_projects references projects
);
We’ll insert now two rows into the PROJECT_ASSIGNMENTS table, without specifying the ASSIGNMENT_ID column, and we’ll see that the rows get a unique ASSIGNMENT_ID value:
> insert into project_assignments (person_id,project_id) values (101,1);
1 row created.
> insert into project_assignments (person_id,project_id) values (102,2);
1 row created.
> select * from project_assignments ;

ASSIGNMENT_ID PERSON_ID  PROJECT_ID
------------- ---------- ----------
            1        101          1
            2        102          2
If we try to specify an ASSIGNMENT_ID value explicitly, we’ll get the following exception:
> insert into project_assignments (assignment_id,person_id,project_id) values (3,103,3);

ERROR at line 1:
ORA-32795: cannot insert into a generated always identity column
The GENERATED BY DEFAULT Option
If we do want the ability to specify the ASSIGNMENT_ID explicitly, and let Oracle assign a value automatically only when we do not specify it, we can use instead the GENERATED BY DEFAULT AS IDENTITY option. Let’s change the ASSIGNMENT_ID column to behave in this way:
> alter table project_assignments modify (
>   assignment_id generated BY DEFAULT as identity
> );
Table altered.
Retrying the last INSERT statement will succeed now:
> insert into project_assignments (assignment_id,person_id,project_id) values (3,103,3);
1 row created.
As I noted before, in the “A Pre-12c Solution” section, mixing manual and automatic assignments of values to the same column may cause conflicts, and unless there is a good reason to do it, I would refrain from it. As mentioned above, the implementation of identity columns uses sequences. In our example, this behind-the-scenes sequence has generated already the numbers 1 and 2, so the next time it will be used it will generate the number 3. However, in the third row that we inserted ASSIGNMENT_ID has the value 3, because we specified it explicitly. ASSIGNMENT_ID is the primary key of the table, so it cannot have the same value in two records. I feel an imminent conflict…
And indeed, trying to insert a record without specifying ASSIGNMENT_ID will fail on a unique constraint violation:
> insert into project_assignments (person_id,project_id) values (104,4);

ERROR at line 1:
ORA-00001: unique constraint (DEMO5.PROJECT_ASSIGNMENTS_PK) violated
Another attempt will succeed, as the sequence has already been incremented:
> insert into project_assignments (person_id,project_id) values (104,4);
1 row created.
The GENERATED BY DEFAULT ON NULL Option
Now, what will happen if we try to set ASSIGNMENT_ID to NULL during INSERT? An identity column is always mandatory – the column is defined as NOT NULL as part of the identity definition (just like it happens when we define a column as PRIMARY KEY) – and since we defined ASSIGNMENT_ID as GENERATED BY DEFAULT AS IDENTITY, the following statement will simply try to insert NULL to ASSIGNMENT_ID, and will fail:
> insert into project_assignments (assignment_id,person_id,project_id) values (null,201,1);

ERROR at line 1:
ORA-01400: cannot insert NULL into ("DEMO5"."PROJECT_ASSIGNMENTS"."ASSIGNMENT_ID")
We can use the third form of the identity clause – GENERATED BY DEFAULT ON NULL AS IDENTITY – which means that Oracle will generate values from the sequence whenever the identity column is not specified explicitly or it is specified explicitly with NULL. Let’s change the ASSIGNMENT_ID to behave in this way:
> alter table project_assignments modify (
>   assignment_id generated BY DEFAULT ON NULL as identity
> );

Table altered.
Retrying the last INSERT statement will succeed now:
> insert into project_assignments (assignment_id,person_id,project_id) values (null,201,1);
1 row created.

> select * from project_assignments;

ASSIGNMENT_ID PERSON_ID  PROJECT_ID
------------- ---------- ----------
            1        101          1
            2        102          2
            3        103          3
            4        104          4
            5        201          1

5 rows selected.
Note: DEFAULT ON NULL is actually an independent feature (new in 12c) – it can be used in the definition of any column, not only identity columns.
Note: It is also possible (as of 12c) to use a user-defined sequence as the default value of a numeric non-identity column. Identity columns, however, give a more complete solution.
Data Dictionary
Let’s see now what has changed in the data dictionary in order to represent identity columns. I’ll refer to the USER_* views, but the same changes are relevant to the corresponding ALL_* and DBA_* views as well.
USER_TABLES has a new column – HAS_IDENTITY – that contains YES if the table has an identity column and NO if not.
select table_name,HAS_IDENTITY from user_tables;

TABLE_NAME                     HAS_IDENTITY
------------------------------ ------------
PEOPLE                         NO
PROJECTS                       NO
PROJECT_ASSIGNMENTS            YES
The fact that USER_TABLES has such a Boolean attribute may hint that a table cannot have more than one identity column, and this is indeed one of the restrictions of this feature (which seems a very sensible restriction, in my opinion).
USER_TAB_COLUMNS has two new relevant columns: IDENTITY_COLUMN and DEFAULT_ON_NULL:
select column_name,data_type,nullable,
       column_id,IDENTITY_COLUMN,DEFAULT_ON_NULL
from user_tab_columns
where table_name = 'PROJECT_ASSIGNMENTS'
order by column_id;

COLUMN_NAME   DATA_TYPE  NUL  COLUMN_ID IDENTITY_ DEFAULT_O
------------- ---------- --- ---------- --------- ---------
ASSIGNMENT_ID NUMBER     N            1 YES       YES
PERSON_ID     NUMBER     N            2 NO        NO
PROJECT_ID    NUMBER     N            3 NO        NO
A new view – USER_TAB_IDENTITY_COLS – contains the details of all the identity columns. In 12.1.0.1 this view contained TABLE_NAME, COLUMN_NAME, GENERATION_TYPE (which can be either ALWAYS or BY DEFAULT) and IDENTITY_OPTIONS (the configuration of the associated sequence). In 12.1.0.2 another column was added – SEQUENCE_NAME – which makes the relationship between the table column and the associated sequence quite formal.
select * From USER_TAB_IDENTITY_COLS;

                                  GENERATION
TABLE_NAME          COLUMN_NAME   TYPE       SEQUENCE_NAME IDENTITY_OPTIONS
------------------- ------------- ---------- ------------- -------------------------
PROJECT_ASSIGNMENTS ASSIGNMENT_ID BY DEFAULT ISEQ$$_111567 START WITH: 1, INCREMENT
                                                           BY: 1, MAX_VALUE: 9999999
                                                           999999999999999999999, MI
                                                           N_VALUE: 1, CYCLE_FLAG: N
                                                           , CACHE_SIZE: 20, ORDER_F
                                                           LAG: N
Let’s take a look at the objects we have in our schema at this point:
select object_type,object_name,object_id from user_objects;

OBJECT_TYPE  OBJECT_NAME                     OBJECT_ID
------------ ------------------------------ ----------
SEQUENCE     ISEQ$$_111567                      111568
TABLE        PEOPLE                             111530
INDEX        PEOPLE_PK                          111531
TABLE        PROJECTS                           111532
INDEX        PROJECTS_PK                        111533
TABLE        PROJECT_ASSIGNMENTS                111567
INDEX        PROJECT_ASSIGNMENTS_PK             111569
We can see the sequence that was created automatically by Oracle for supporting the ASSIGNMENT_ID identity column of the PROJECT_ASSIGNMENTS table. Note that the sequence_name contains the object_id of the associated table.
What happens when we drop the table?
drop table project_assignments;

select object_type,object_name,object_id from user_objects;

OBJECT_TYPE  OBJECT_NAME                     OBJECT_ID
------------ ------------------------------ ----------
INDEX        PROJECTS_PK                        111533
TABLE        PROJECTS                           111532
INDEX        PEOPLE_PK                          111531
TABLE        PEOPLE                             111530
SEQUENCE     ISEQ$$_111567                      111568
We can see that the table was dropped but the sequence was not. This may seem disappointing at first, but actually this is quite clever. The table was dropped but not purged, so it is still in the recycle bin (I’m using the default setting of the RECYCLEBIN parameter, which is “on”):
select object_name,original_name,operation,type from user_recyclebin;

OBJECT_NAME                    ORIGINAL_NAME          OPERATION TYPE
------------------------------ ---------------------- --------- ----------
BIN$lNxGd9cXTAuYpOa9kda26w==$0 PROJECT_ASSIGNMENTS    DROP      TABLE
BIN$qvScIgi+Rrel7veFMBxXsQ==$0 PROJECT_ASSIGNMENTS_PK DROP      INDEX
If we revive the table using FLASHBACK TABLE
flashback table project_assignments to before drop;
we can resume working with the table, and particularly with the identity column, because the sequence was not dropped:
insert into project_assignments (person_id,project_id) values (201,1);

select * from project_assignments;

ASSIGNMENT_ID  PERSON_ID PROJECT_ID
------------- ---------- ----------
            1        101          1
            2        102          2
            3        103          3
            4        104          4
            5        201          1
            6        201          1
If we drop the table and purge it (or purge the table from the recyclebin), then the associated sequence is dropped as expected:
drop table project_assignments purge;

select object_type,object_name,object_id from user_objects;

OBJECT_TYPE  OBJECT_NAME                     OBJECT_ID
------------ ------------------------------ ----------
TABLE        PEOPLE                             111530
INDEX        PEOPLE_PK                          111531
TABLE        PROJECTS                           111532
INDEX        PROJECTS_PK                        111533

select object_name,original_name,operation,type from user_recyclebin;

no rows selected
Sequence Configuration
When we create a sequence explicitly we can configure its attributes – from which number to start, the interval between numbers, the cache size, and more. When we create an identity column, we can similarly configure the implicitly-created sequence. For example, let’s recreate the PROJECT_ASSIGNMENTS table, but this time with a sequence that starts with 1000 and increments by 10:
create table project_assignments (
       assignment_id integer GENERATED AS IDENTITY
                             (start with 1000 increment by 10)
                             constraint project_assignments_pk primary key,
       person_id integer not null  constraint assignments_fk_people references people,
       project_id integer not null constraint assignments_fk_projects references projects
);

insert into project_assignments (person_id,project_id) values (101,1);
insert into project_assignments (person_id,project_id) values (102,2);
insert into project_assignments (person_id,project_id) values (103,3);

select * from project_assignments;

ASSIGNMENT_ID  PERSON_ID PROJECT_ID
------------- ---------- ----------
         1000        101          1
         1010        102          2
         1020        103          3
DROP IDENTITY
A non-identity column cannot become an identity column. The opposite, however, is possible: an identity column can become a non-identity column, and its associated sequence is automatically dropped:
alter table project_assignments modify assignment_id DROP IDENTITY;
select * from user_tab_identity_cols;

no rows selected

select object_type,object_name,object_id from user_objects;

OBJECT_TYPE  OBJECT_NAME                     OBJECT_ID
------------ ------------------------------ ----------
TABLE        PEOPLE                             111530
INDEX        PEOPLE_PK                          111531
TABLE        PROJECTS                           111532
INDEX        PROJECTS_PK                        111533
TABLE        PROJECT_ASSIGNMENTS                111570
INDEX        PROJECT_ASSIGNMENTS_PK             111572
START WITH LIMIT VALUE
Let’s see one last option that is possible only because there is a real association between the table column and the sequence. I’ll drop the PROJECT_ASSIGNMENTS table and recreate it once more, with the GENERATED BY DEFAULT AS IDENTITY clause, and insert some records with explicit values in ASSIGNMENT_ID:
drop table project_assignments purge;
create table project_assignments (
       assignment_id integer GENERATED BY DEFAULT AS IDENTITY constraint project_assignments_pk primary key,
       person_id integer not null constraint assignments_fk_people references people,
       project_id integer not null constraint assignments_fk_projects references projects
);
insert into project_assignments (assignment_id,person_id,project_id) values (18,101,1);
insert into project_assignments (assignment_id,person_id,project_id) values (22,102,2);
insert into project_assignments (assignment_id,person_id,project_id) values (34,103,3);

select * from project_assignments;

ASSIGNMENT_ID  PERSON_ID PROJECT_ID
------------- ---------- ----------
           18        101          1
           22        102          2
           34        103          3
Suppose that now I want to convert the identity column to be GENERATED ALWAYS AS IDENTITY. Since the table already contains records, I need to prevent collisions between the existing values and the future to-be-automatically-generated values, and therefore I’d like to start the sequence from a number that is higher than all the existing ASSIGNMENT_ID values (in our case, 35).
We can make Oracle doing it automatically, by using the START WITH LIMIT VALUE clause:
alter table project_assignments modify assignment_id
generated always as identity (START WITH LIMIT VALUE);

insert into project_assignments (person_id,project_id) values (104,4);
select * from project_assignments;

ASSIGNMENT_ID  PERSON_ID PROJECT_ID
------------- ---------- ----------
           18        101          1
           22        102          2
           34        103          3
           35        104          4
Conclusion
We saw in this part of the Write Less with More series that Identity Columns allow us to write less application code.
The next post will be about another new Oracle 12c feature – In-Database Archiving.